Chicken Dust Bath Setup: Sand, Soil, or Something Else?
Four hens, one roofed 3 × 2 foot box, and 6–8 inches of loose material will give you a sensible starting chicken dust bath. Sand, soil, or something else can work, but dryness and texture matter more than copying a fancy ingredient list.
Build the bath so your birds can step in, scratch a hollow, and roll without standing in droppings. Then let one wet-dry cycle in your own yard tell you whether the mix needs more soil, more sand, or a better roof.
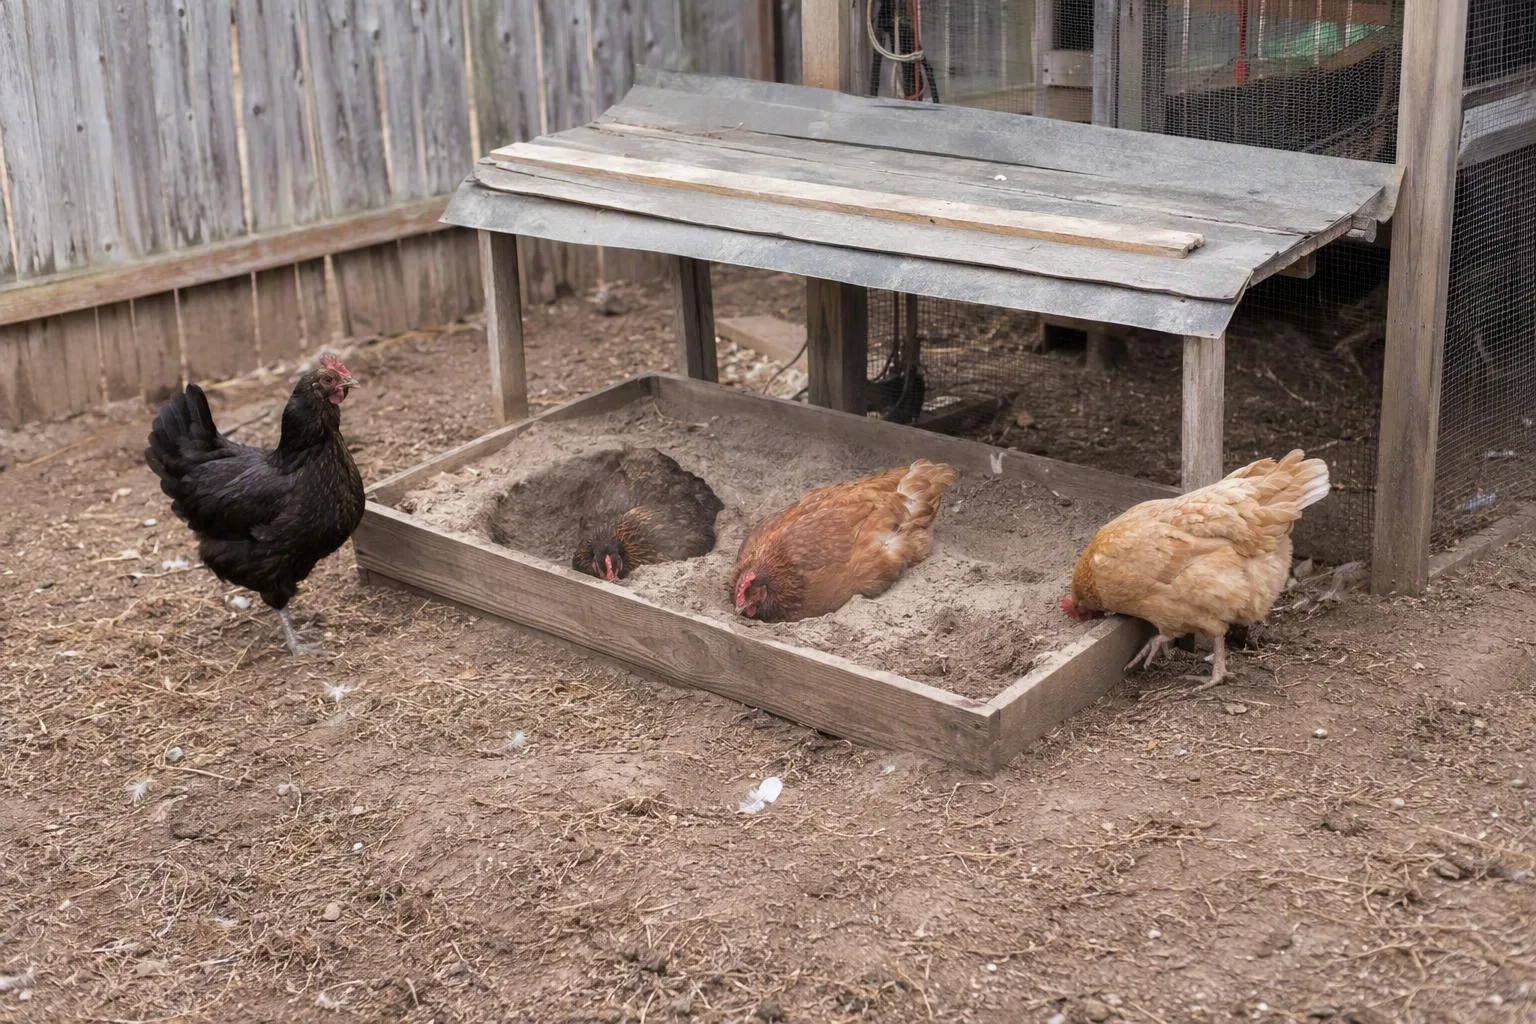
For four hens, start with a roofed 3 × 2 ft box and 6–8 inches of mix
For three or four adult hens, I’d start with about 6 square feet of usable floor. A 3 × 2 foot box provides that area. “Usable” means the space after you allow for thick walls, large rocks, or a corner that stays wet. Give it 6–8 inches of loose mix so a hen can scratch a shallow bowl instead of scraping her breast against the floor.
The walls should contain the material, not form a tall obstacle. A box with a low entry is easier for bantams, heavy breeds, older hens, and birds with stiff legs. If you use a tub with a high rim, add a stable step or cut down one side. Keep every edge smooth.
On a hot July afternoon in my own small run, my older Sussex stepped into a tall storage tote, scratched twice, and backed out when the rim caught her breast feathers. I lowered one end of the tote. The next morning she was rolling in the same mix while two younger hens waited beside her. The useful lesson was simple: a bath that is easy to enter will beat a deeper bath that feels awkward.
For 10–12 hens, I’d provide two stations rather than one crowded box. Place them apart if you can. That gives a timid bird another place to use and prevents one dominant hen from owning the whole bathing area. Treat these dimensions as a practical starting point, not a fixed minimum for every breed or run.
Sand, soil, or a blend? Let your post-rain test choose
Plain, clean topsoil gives your hens fine particles for grooming. It also gives the bath body. The catch is that soil with a lot of clay can smear, compact, and set like a crust after rain. Soil dug from a treated lawn or an area that receives chemical applications is not a sensible ingredient.
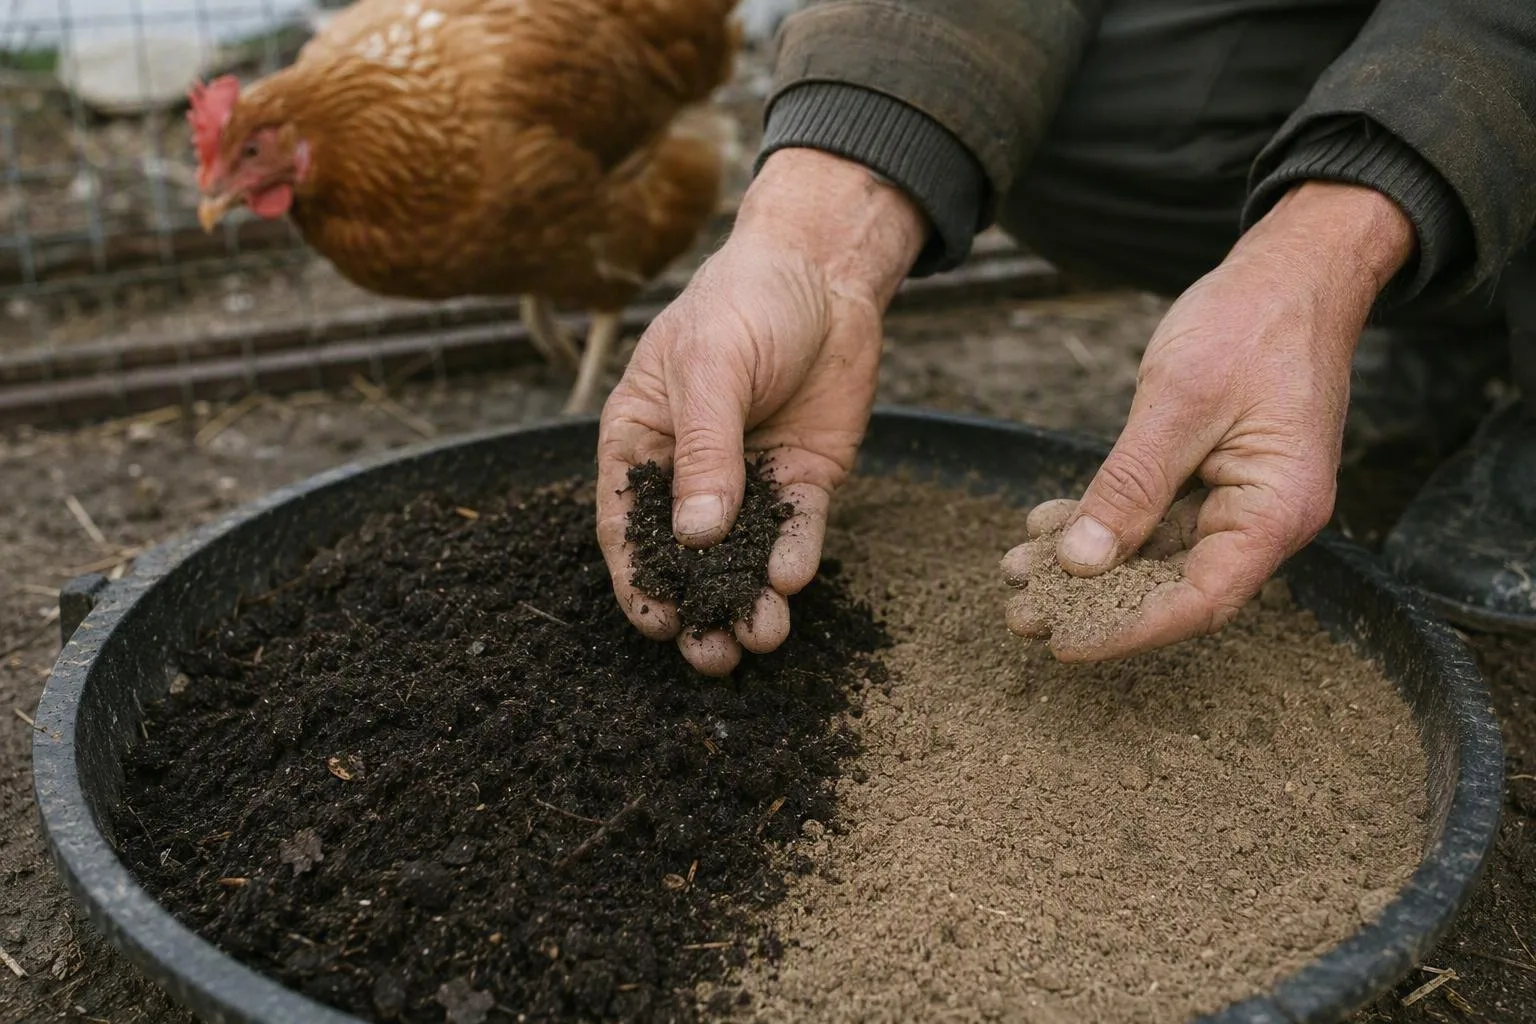
Washed, screened medium-to-coarse sand drains readily and stays loose in a sheltered box. Used alone, it can slide under scratching feet or become unpleasantly powdery, depending on the grade. I prefer sand that has some body rather than the finest dust. Avoid beach sand and unknown fill, since you can’t know what contamination or sharp fragments are mixed through it.
Start a small test with a 2:1 blend of dry soil to sand by volume: two buckets of clean soil to one bucket of screened sand. This isn’t a universal recipe. It’s a useful first adjustment because the soil supplies fine particles and the sand interrupts some of the soil’s tendency to pack.
- Squeeze a handful after the material has been exposed to ordinary yard humidity. If it makes a slick, hard lump, add dry sand and improve the cover.
- Rub it between your fingers. You want loose crumbs and texture, not flour-like dust or a sticky smear.
- Let the sample go through one wet-dry cycle before filling the main bath. Check whether it dries loose or forms a hard cap.
After three days of spring rain, I found that the open corner of my run looked dry on top but held a damp, compacted layer underneath. My hens scratched there, then moved away without rolling. I broke up that layer, shifted the bath under a wider roof, and used a little more sand in the next refill. The behavior changed before I changed anything else.
Clean coconut coir or peat moss can be used as a small texture modifier if you already have a clean, additive-free product. I don’t treat either as necessary. Keep fertilized potting soil, perlite, vermiculite, scented litter, and unknown landscaping fill out of the box.
The safe ingredient list: clean base first, optional ash only
A clean, dry soil-and-sand base is enough for a functional chicken dust bath. Your birds don’t need a special additive to scratch, fluff their feathers, and roll. I won’t give you a universal ash ratio because the safety of ash depends on its source, age, moisture, and what was burned.
If you choose to try wood ash, use only fully cooled ash from clean, untreated, unpainted wood. Keep it to a small minority of the mix, not half the box. A light amount mixed through the base is a different proposition from a deep layer of loose ash that your hens can inhale.
Wet wood ash can become strongly alkaline and irritating. That is one reason a roof matters even if you decide not to use ash. Leave out coal ash, charcoal-briquette ash, painted or treated wood ash, lime, pesticides, essential oils, scented products, and manure.
Some clumping litters are bentonite-based and are designed to swell or bind when they get wet, so I leave them out of a chicken dust bath. I also leave routine diatomaceous-earth additions out. Fine powders can become an inhalation concern, and neither ash nor diatomaceous earth is a dependable substitute for inspecting birds and housing when parasites are suspected.
In my current setup, I don’t add ash at all. Keeping the base clean and dry gives me fewer ingredients to identify if a hen develops irritated skin or starts avoiding the box.
Keep rain out without trapping damp: roof, floor, and entry
Placement changes the answer more than the perfect recipe does. Put the bath under a roof that extends roughly 6–12 inches beyond each exposed edge of a 3 × 2 foot box. That overhang protects the mix from angled rain, not just the straight-down kind.
Raise the floor about 2–4 inches above surrounding soil, or set the box on well-draining pavers. Don’t place it where the run slopes toward it. Keep it outside the roost’s drip zone, too. Droppings and condensation can make a covered bath dirty even when rain never reaches it.
Shade is useful in a hot climate, especially during the part of the day when your birds are most active. The same planning used for keeping chickens cool in hot weather applies here: give them a cooler retreat without sealing the bath in a damp, airless corner.
Open sides and sensible chicken coop ventilation help moving air carry moisture away from the surrounding run. They won’t dry a bath that is being rained on or flooded from below. Leave enough room around the box for air movement, but don’t put it in a strong wind tunnel that strips the fine material out.
For bantams or older hens, use a low lip. For large breeds, a broad, stable entry is kinder than a narrow step. A plastic tub can work if it doesn’t rock, crack, or have a sharp rim.
A five-minute weekly check beats a fixed replacement calendar
Set aside about five minutes once a week and check the bath before you check your feed scoop. I use this short sequence:
- Pick out droppings, feathers, leaves, and obvious debris.
- Loosen the top layer with a scoop or gloved hand.
- Break up crusted patches and feel below the surface for hidden dampness.
- Top up when the usable depth falls below about 4–6 inches.
Rain, humidity, shade, roof coverage, and flock size will move that schedule. A dry bath in an arid summer may need little more than raking. A bath in a humid coastal run may need wet patches removed several times between weekly checks.
Replace material when dampness persists, an odor develops, the surface crusts repeatedly, or manure has spread through a large part of the box. Waiting for a monthly date makes little sense if the bath is already wet; replacing it on a calendar also wastes material if it is still clean and loose.
If material has been exposed to medication or pesticide residue, keep it out of compost and follow the product label’s disposal instructions. Don’t spread suspect material where your hens forage.
If your hens ignore it, change one variable over three days
Give a new bath three days of ordinary observation before deciding it has failed. Watch what your hens do, not what you hoped they would do.
- They scratch but don’t roll: check depth, dampness, compaction, and excessive powder. A bird may be testing the surface without finding a comfortable hollow.
- They use a run corner instead: that corner may be drier, softer, sunnier, or more sheltered. Move the bath there if the spot is safe, or add a second station beside it.
- The bath becomes crowded: add another 3 × 2 foot station for a small flock rather than trying to make one bird wait.
- No bird uses it after about seven days: change one factor at a time—location, shade, texture, or depth. Give each change enough time to show whether it mattered.
I’d start with location before buying another additive. Chickens often choose the place that already feels right under their feet. That’s my original take on dust baths: architecture usually beats recipe chasing. A dry corner with an easy entry can outperform a complicated mix sitting in the wrong place.
Dust bathing is grooming, not mite treatment
A dust bath supports normal grooming, but it isn’t a reliable mite or lice treatment. Rolling and fluffing can remove some loose debris from feathers, yet a bath does not reach every parasite, egg, roost crack, or skin fold.
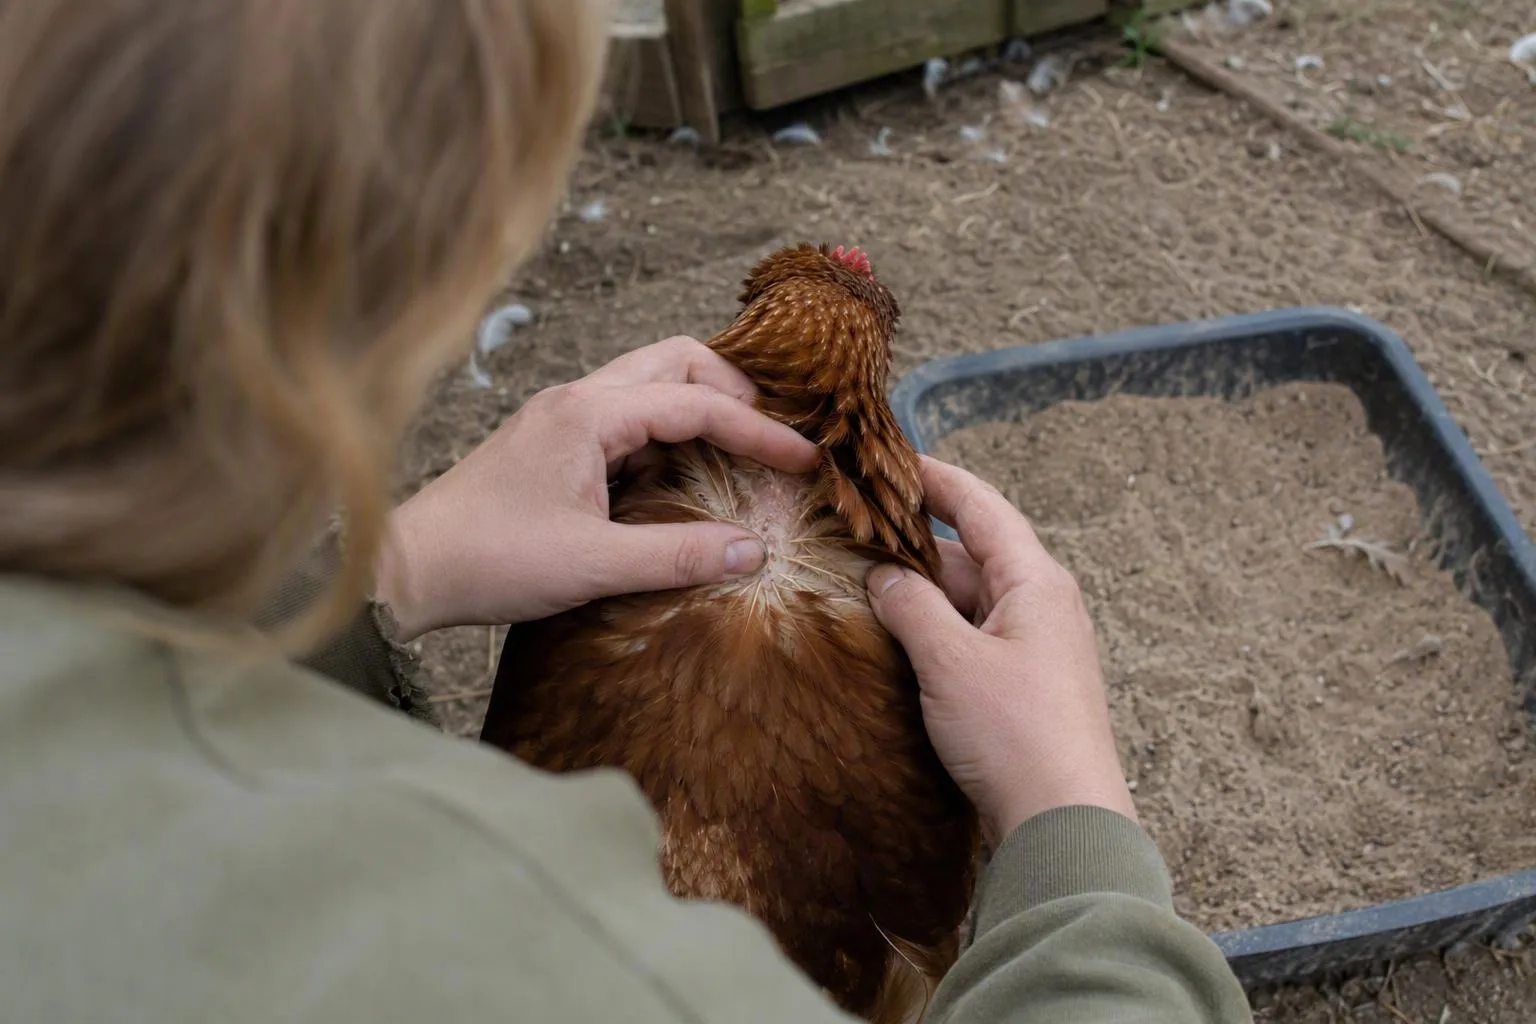
Inspect a bird in daylight by parting the feathers around the vent, under the wings, and around the tail. Look for insects, eggs or nits, scabs, broken feathers, and irritated skin. Then inspect the roost, perch ends, nest-box joints, and cracks after dark with a torch. Some mites hide in housing during daylight and may be active on birds after dark.
Visible insects or nits, persistent scratching, scabs, open sores, a pale comb, lethargy, weight loss, or symptoms in several birds are good reasons to contact a poultry veterinarian or local extension office. A bird that is weak, rapidly worsening, or unable to eat or drink needs more than a bath adjustment.
That is where a labeled chicken mites treatment belongs. Follow the product label for species approval, application, repeat timing, protective equipment, and egg-withdrawal instructions. Don’t invent a dose from a forum post, and don’t assume a product approved for one animal is approved for laying hens.
For a second set of eyes on parasite terminology and treatment boundaries, I’d check Merck Veterinary Manual guidance. For housing moisture and litter questions, University extension guidance can be a useful outside check. Neither replaces looking at the actual bird, run, and coop in front of you.
If your hens are dusty but still scratching hard, keep investigating. Grooming behavior can look reassuring while an infestation continues elsewhere.
Three edge cases worth answering
Can you use a kiddie pool or plastic tub as a chicken dust bath?
Yes, if the container is sturdy, stable, non-slip, free of sharp edges, and low enough for easy entry. Use the same usable floor area and 6–8 inch material depth as the box setup. A raised base or drainage underneath matters if the tub sits outdoors.
Should chickens have access to a dust bath in winter?
Yes, if the material can stay dry and unfrozen. A sheltered run or temporary low tray can work. Don’t heat the bath as a substitute for dry housing and sensible airflow. The wider winter question is covered in do chickens need heat in winter.
Why is my chicken dust-bathing in the feeder or bedding instead?
Your hen may prefer that spot because it is drier, softer, or better sheltered. Move or duplicate the bath there only if the location is safe, and keep feed and water separate. If scratching comes with skin irritation or visible parasites, inspect the bird rather than treating the behavior as a simple preference.
This week, mark out a 3 × 2 foot space, add a roof and raised base, and fill it with a small 2:1 soil-to-sand test batch. Check it after the next wet-dry cycle. If it stays loose, clean, and easy to enter, you’ve built a bath your flock can actually use.
Frequently Asked Questions
Can you use a kiddie pool or plastic tub as a chicken dust bath?
Yes, if the container is sturdy, non-slip, free of sharp edges, low enough for easy entry, and protected from rain. Use the same usable floor area and 6–8 inch depth as the box setup, and provide drainage or a raised base.
Should chickens have access to a dust bath in winter?
Yes, when the material can stay dry and unfrozen. A sheltered run or temporary low tray can work, but damp material should be removed and the bath should not be heated as a substitute for dry housing and ventilation.
Why is my chicken dust-bathing in the feeder or bedding instead?
Your bird may prefer that spot because it is drier, softer, or better sheltered. Move or duplicate the bath there if safe, keep feed and water separate, and inspect the bird if scratching is paired with skin irritation or visible parasites.