How High Should Roosting Bars Be? 18–24 Inches Works
For most healthy standard-size adult hens, put the top of the finished bedding surface 18–24 inches below the top of the main roosting bar. That’s the useful starting point for a small backyard coop, not a height you must force on every bird.
Measure from where your birds’ feet will land after litter is in place. A bar that sits 24 inches above a bare floor becomes an 18-inch roost after six inches of bedding. That small measuring mistake can turn an easy hop into an awkward launch, especially in a short coop.
My practical rule is to design around the least mobile bird. Choose about 18 inches for heavy breeds, older hens, birds with leg or foot trouble, and low ceilings. Use 24 inches only when your birds are agile and the landing area is open.
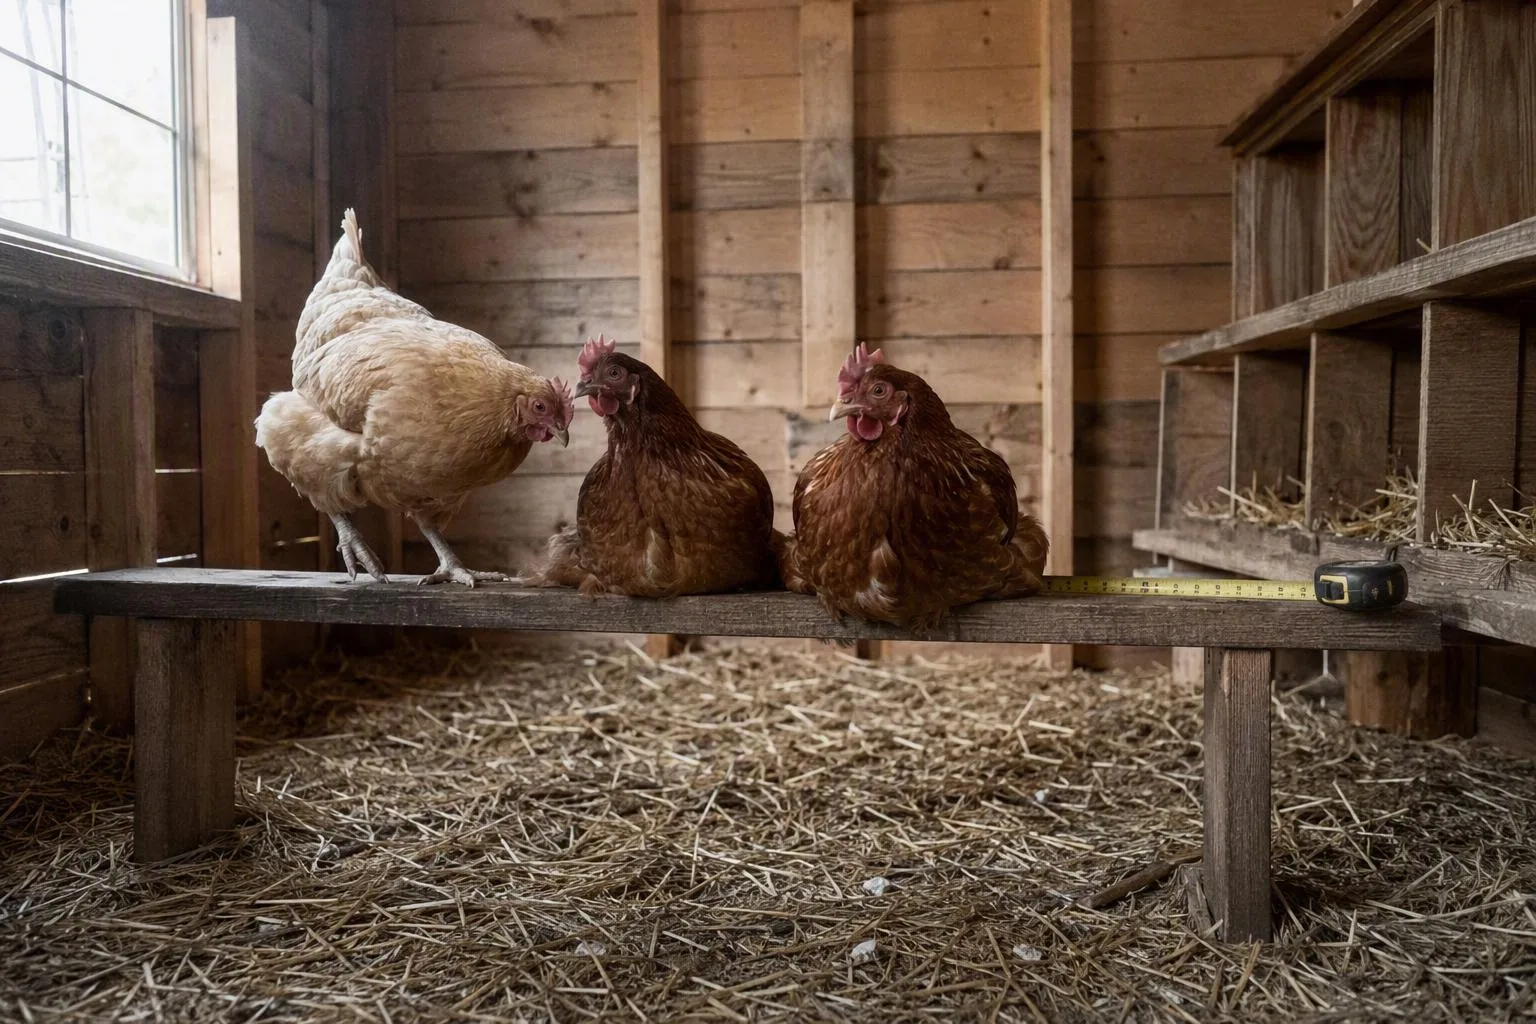
18–24 inches is the adult starting point—not a rule for every bird
A raised perch gives your birds a separate sleeping place above the traffic and damp litter on the floor. It also matches the basic roosting behaviour you’ll see at dusk: birds tend to settle on a high, narrow surface rather than lie in the bedding. But height is useful only up to the point where every bird can reach it without a hard landing.
Here’s the decision table I’d use for a small backyard flock:
| Bird group | First perch position | What to watch |
|---|---|---|
| Healthy standard-size adults | 18–24 inches | Use 18 inches for an easy start; use 24 inches with a clear landing zone. |
| Heavy, elderly, injured, or poor-flying birds | About 12–18 inches | Choose the lower end if one bird lands stiffly, misses the bar, or avoids jumping. |
| Chicks old enough to perch | 2–6 inches temporarily, then progress toward 6–12 inches | Give them a low, secure option before offering the adult-height bar. |
The 12–18-inch range for a less mobile hen isn’t a failure to provide a proper roost. It’s a way to preserve the benefit of elevation without making the bird gamble on a jump. A heavy hen has more momentum when she lands. An older hen may not flex her legs as easily. A bird with a sore foot may be able to climb a ramp but not launch cleanly from the floor.
Extra height also increases the distance and angle of a missed landing. A bird may clip the wall, collide with a second bar, or come down hard on one foot. In a coop with a low ceiling, the bird may not have enough room to lift its wings and correct its approach. That’s why 24 inches is a reasonable upper starting point for agile birds, not a target to beat.
Make the least mobile bird the limiting factor. If you keep four hens and one has a stiff leg, I’d start the main perch at 18 inches and plan 32–48 inches of usable roost length. You can add a higher bar later if the flock shows that it wants one. You can’t make a too-high bar safe for the weak bird by calling it natural behaviour.
Newly hatched chicks are a separate case. Don’t make a tall adult bar their only sleeping surface. A low strip of wood gives a young bird somewhere to practise balance without turning a slip into a long fall. Raise that temporary perch in small steps as the chicks become stronger and more coordinated.
Perch length, shape, and spacing decide whether that height is usable
A correct height won’t help if your birds have to squeeze together or land on a sharp edge. Build the perch as a piece of furniture, not as a broom handle balanced between two walls.
Start with 8–12 inches of linear roost space per adult hen. Three birds therefore need 24–36 inches of usable bar. Twelve birds need 96–144 inches, or 8–12 feet. Those are straight-line inches that birds can actually occupy. Don’t count the part buried inside a bracket, the last few inches beside a wall, or a section blocked by a divider.
For standard hens, a rounded perch about 1.5–2 inches across is a practical starting shape. The goal is a surface broad enough for the toes to curl around without forcing the foot into a tight grip. For bantams, about 1–1.5 inches gives a smaller foot a more manageable wrap. A smooth dowel can work, but a square timber with its corners eased can be easier to build and clean.
In a cold climate, a 2x4 laid on its broad face is a sensible option for standard hens. The wider top lets a bird settle with more of its foot supported, including the toes that would otherwise project into cold air. Ease every corner with sandpaper. Remove splinters, sharp cuts, and loose bark before the bar goes into the coop. I prefer a broad, slightly rounded timber over a perfectly round pole that makes a heavy hen grip all night.
Give the bar at least 12 inches of clearance from the wall behind it. If you install parallel bars, leave roughly 12 inches between them so a bird can land without brushing the bird beside it. Keep the bars at the same height when possible. If one bar is directly above another, the lower bar becomes a collection point for droppings from the upper one, and the landing route gets messy.
The attachment must be rigid. Push down on each end before the birds use it. If the bar twists, bounces, or pulls a screw loose, your birds will feel that instability every time they land. A non-wobbling perch with softened edges is safer than a higher perch with a fancy shape. For a second check, compare your plan with university extension guidance on backyard chicken roost height, then adapt it to your flock’s size and mobility.
A comfortable perch is more than a horizontal stick. It needs enough length for the whole group, a foot-friendly top, open air around the landing side, and supports that don’t move.
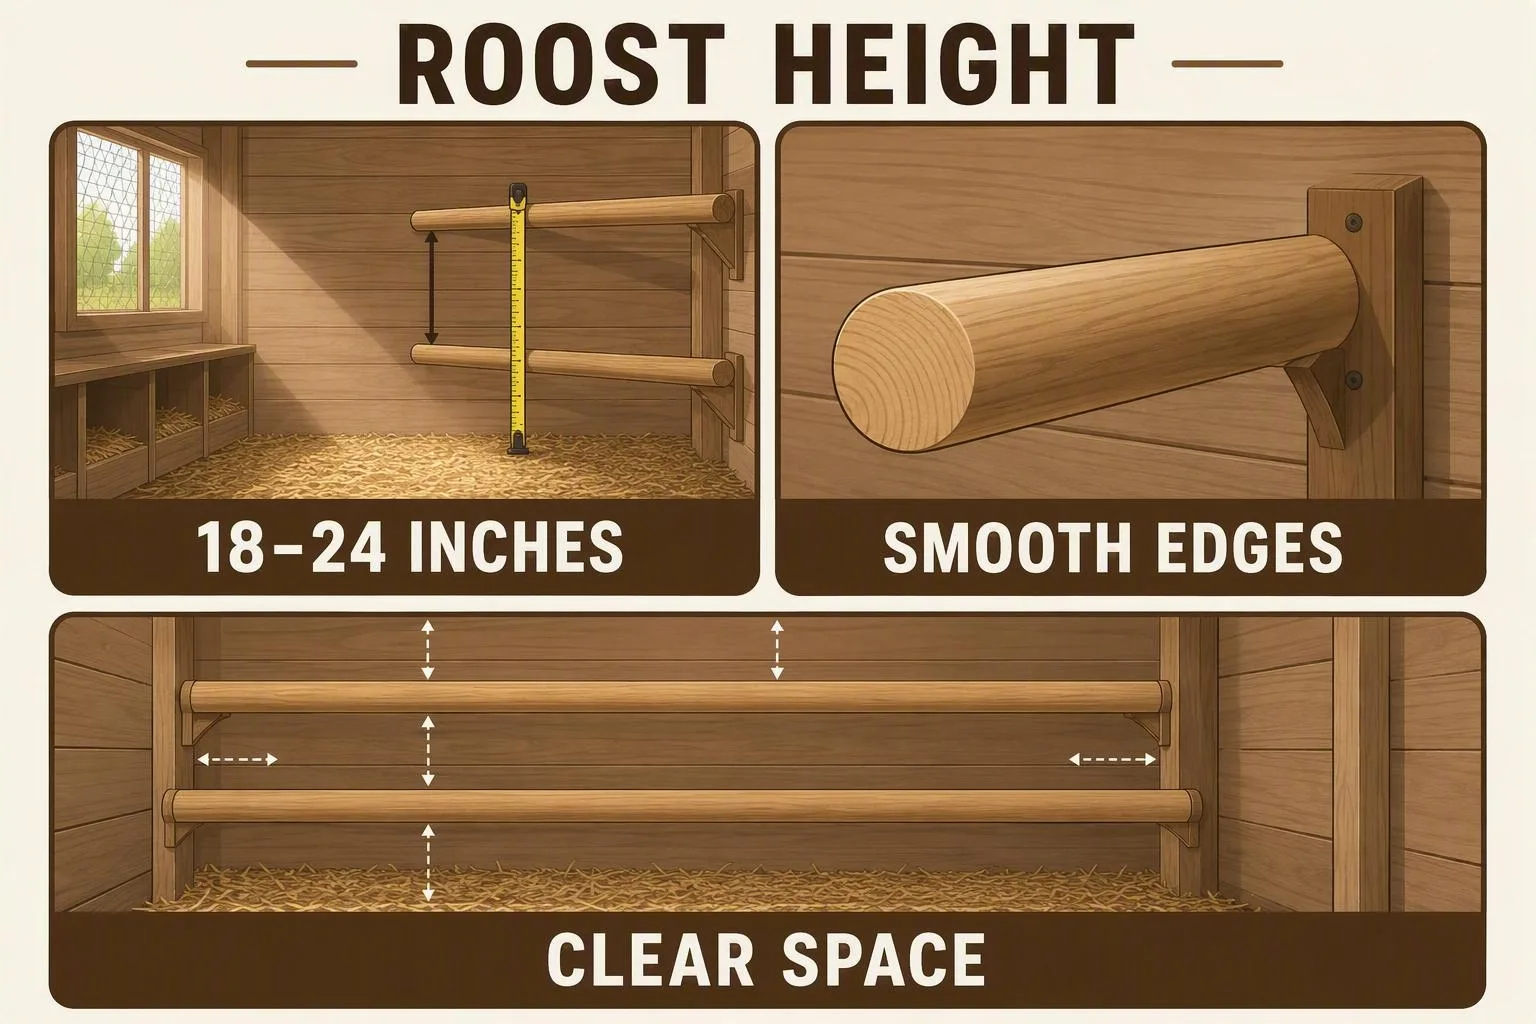
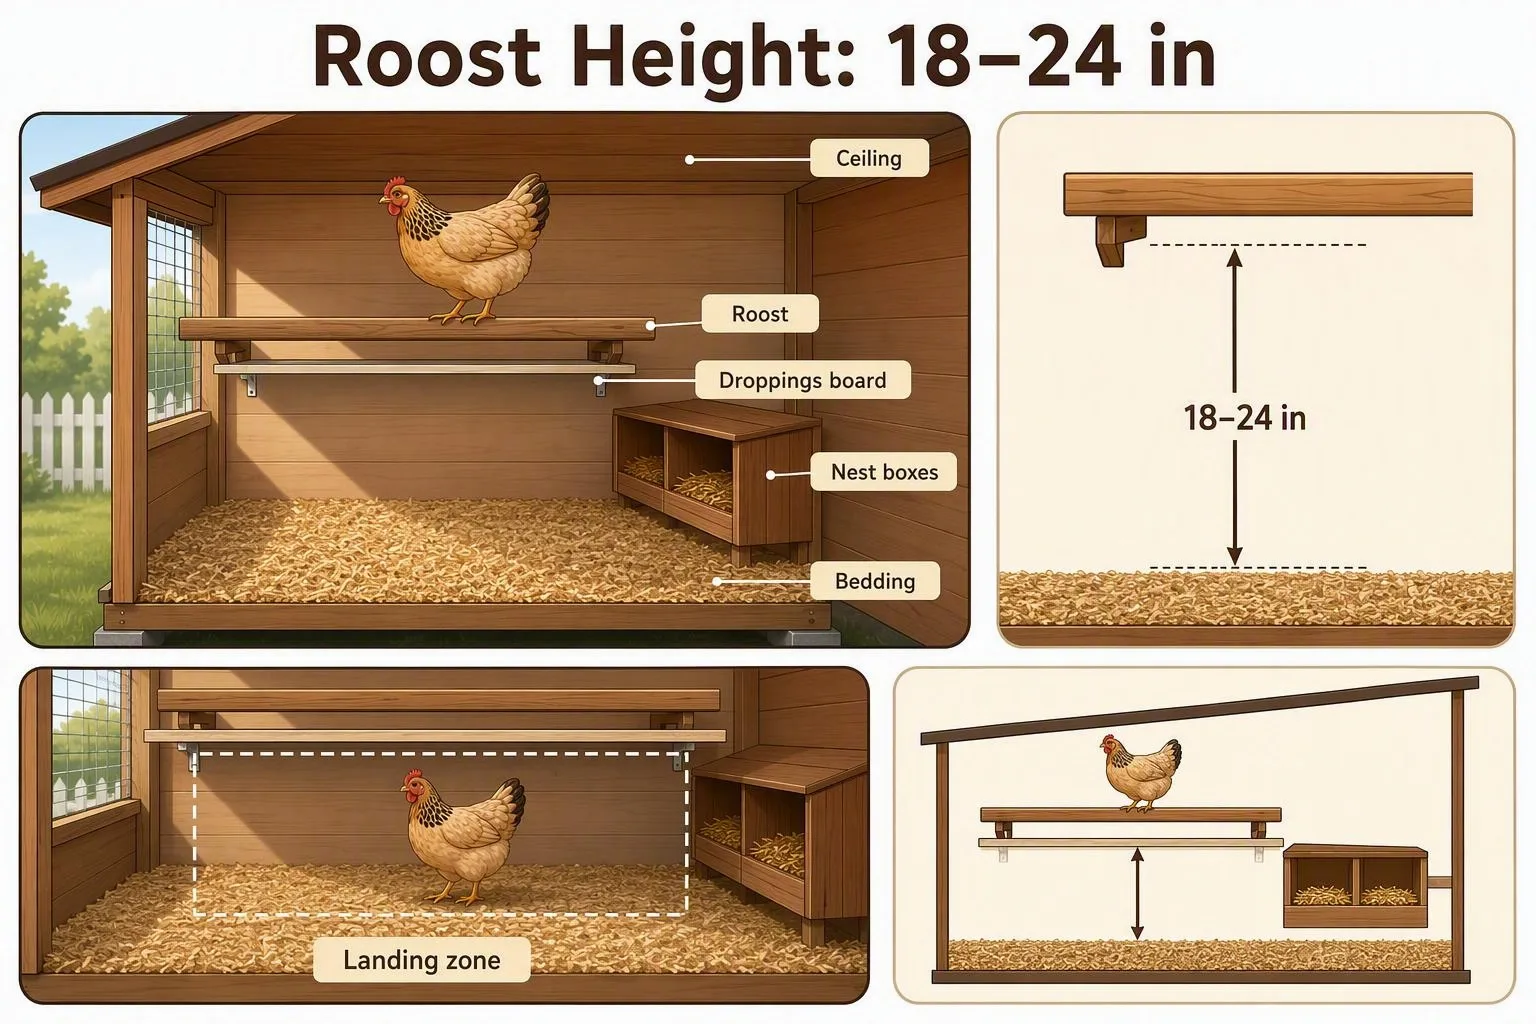
Draw the side view before you screw the bar in
A side view exposes problems that a floor plan can hide. On paper, a bar may fit neatly across the back wall. In the coop, it may leave a bird launching straight into the ceiling, landing on a nest-box roof, or walking through the waterer to reach its sleeping place.
Draw the finished bedding line first. Then lay out the perch and the space around it in this order:
- Set the bar height from the bedding line. Mark the top of the bedding, not the bare subfloor, and place the adult bar 18–24 inches above that line. If you expect 4–6 inches of litter, account for it before drilling.
- Reserve open space above the bar. Plan about 12–18 inches from the top of the perch to the ceiling. This gives your birds room to sit upright and helps prevent a short, cramped launch.
- Leave landing room in front. Keep at least 12 inches of clear space on the approach side. A feeder, waterer, pop door, wall shelf, or low beam can turn that open distance into an obstacle course.
- Keep nest-box openings below the roost. Put the opening about 6–12 inches below the perch when the coop allows it. Birds look for the higher sleeping surface, while the boxes remain less attractive as overnight beds.
- Add a droppings board only if you can clean it. A board roughly 12–18 inches below the perch catches waste before it reaches the bedding. Leave enough room to slide it out or reach it with a scraper.
The bedding line is the part most often missed. If a fixed bar is 20 inches above the subfloor and you later add 5 inches of bedding, the birds have only 15 inches of effective height. That may be helpful for an older hen, but it may also leave a perch too close to the landing litter or droppings board. Mark both measurements on the wall before you fill the coop.
Nest-box placement deserves a little restraint. The boxes don’t need to be far below the roost. They need to be clearly lower and less comfortable as sleeping ledges. If the top of a box is level with the bar, a hen can step straight onto it. Once she sleeps there, the box fills with droppings and your clean eggs have a dirty landing place. Review chicken nesting box size as part of the same side-view sketch, because a box that is too small or badly placed can create a roosting problem that height alone won’t fix.
Don’t put the waterer directly under the bar. Don’t force the flock to pass through a narrow doorway to reach the perch. And don’t spend your entire height allowance on the bar while leaving no room above it. A roost is a route, a seat, and a sleeping platform at the same time.
A side view also makes winter decisions easier. You can see whether a bar sits in the direct path of a draft, whether a solid wall blocks the landing, and whether adding bedding will change the usable height. If the coop is enclosed tightly to solve one problem, check chicken coop ventilation before moving the birds into the new layout.
A two- or three-night dusk check catches a bad height faster than guessing
Install the first bar as a trial, then watch your flock at dusk for two or three nights. Don’t judge the design from a single evening after moving the furniture. Birds may pause because the bar is unfamiliar, because one hen has claimed the approach, or because they’re still following their old bedtime route.
Watch the approach, not just the final sleeping position. These patterns point you toward the next adjustment:
- Every bird stays on the floor: Check whether the bar is too high, slippery, crowded, drafty, or hard to reach. Lower it by about 6 inches as a temporary test. If the flock uses it then, you’ve learned that access was the problem.
- One or two birds remain on the floor: Compare their size, age, leg movement, and position in the flock. Add usable length or a low ramp before raising the bar. A dominant bird may be guarding the easiest landing spot, so watch the whole approach.
- Birds sleep in the nest boxes: Check the height relationship first. Raise the roost by 6–12 inches relative to the box only if the ceiling and landing zone remain safe. If the bar is already high, look for crowding or an uncomfortable perch rather than adding more height.
- Birds fall, collide, or miss the landing: Lower the bar, widen the landing zone, separate parallel bars, and inspect the perch for slick paint or sharp edges. Repeated failed landings are a layout signal, not a reason to make the next bar higher.
Change one variable at a time. If you lower the bar, add a ramp, move the boxes, and replace the wood on the same evening, you won’t know which change helped. A temporary, firmly attached bar is useful because you can test the position before making permanent holes in the coop.
One bird deserves a different response. If a hen avoids the bar alone, cannot bear weight, walks with a marked limp, or has a swollen foot, give her a hands-on health check. Look for an obvious injury, a damaged foot pad, or a problem that affects both legs. If she still cannot bear weight or the swelling is significant, contact a poultry veterinarian or local extension office. Rebuilding the roost repeatedly won’t correct a painful foot.
The right roost isn’t the highest bar your strongest hen can reach. It’s the highest bar every bird can reach safely.
This week, measure from the finished bedding line to the ceiling, mark an 18-inch test position, and install one temporary secure bar with a clear landing area. Watch the flock at dusk for two or three nights. If they settle comfortably, make that layout permanent; if they don’t, adjust the height or route before buying more lumber. For the rest of the coop plan, use how much space do chickens need and chicken coop ventilation as the next checks.